Beginning a Project
Choosing an app
If you’re working on your laptop, you have a few choices for apps that you can use to develop code:
- RStudio Desktop. RStudio is probably the most widely-used app for R coding at the moment.
- Positron. Positron is new, it’s free, and it describes itself as a data science IDE. It also works well with Python.
- Notebooks such as Jupyter (for example, running with Anaconda) or Google Colab
- DataSpell. Free for students, teachers, and community, but not for others.
- Other software development apps such as VSCode
You can also use a web-based R environment. Choices include:
- posit.cloud. There are limitations with the free version; you can pay more for more projects, more space, more computing power, etc.
- If you (or your institution/orgainzation) has a web server, you can install RStudio Server and access it through the web browser. You would then only be limited by the size of the server it’s running on.
If you’re aware of other good options, please let me know!
Step 1: Make an RStudio project
In RStudio, always use projects!
I cannot emphasize this enough. RStudio projects allow you to keep each project separate from your other projects.
Benefits of using projects
- Your project has its own folder, so your files don’t mix with other projects.
- Your code’s context is this folder, so file paths can be relative, not absolute. For example, this will allow you to read a file from
data/myfile.csvrather than from/Users/dan/projects/project1/data/myfile.csv. This way, it doesn’t matter where your project folder is located within your computer – or the computer of anyone else who might use your code. - Rstudio remembers your open files, plots, and environment when you close a project. When you reopen it, everything is right where you left off.
- You’ll be able to make your project a Git project/repository, because Git also assumes that each project is in its own folder.
There are other benefits as well, but these alone should sufficiently convince you to always use projects in RStudio! There should be a similar notion in other apps you might use to write your code.
How to make an RStudio project
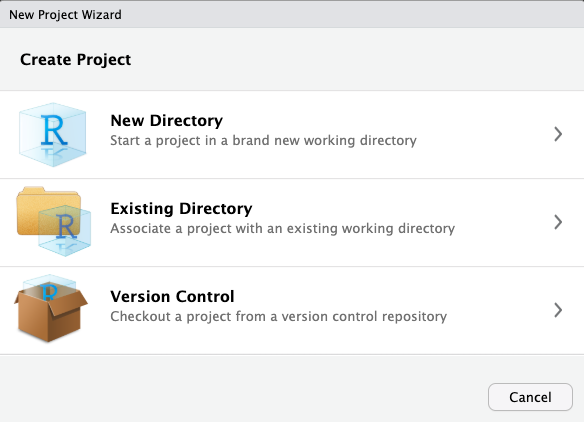
From the File menu, select New Project... RStudio will then ask you whether to start a project in a new directory, an existing directory, or to check out a project from a version control repository (such as GitHub).
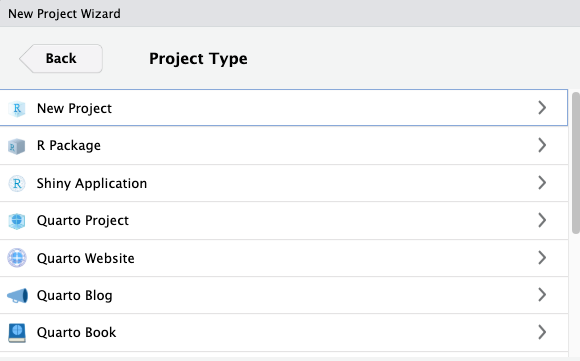
Now you’ll select which type of project to create. There is a long list here worth exploring! But for today, we’ll select the first option, New Project since we’ll be using R to focus on data analysis and visualization.
Before RStudio creates the new folder for your project, it asks you where to create the new folder on your computer. Since we don’t have any pre-existing assets for this project, choose New Directory. Here you get to choose the parent folder inside which the new project folder will be created. Which parent folder you choose really depends on how you like to organize your projects on your computer.
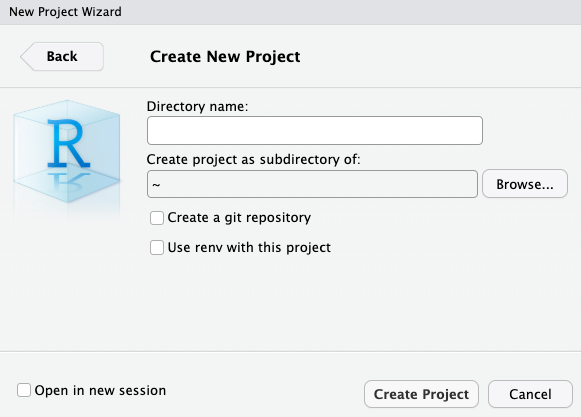
Enter the name of the project, which will be the name of the new directory (folder), in the Directory name: box.
Click the Browse... button to select a different parent folder. ~ represents your home folder, which will usually be something like /Users/YourName or C:\User\YourName depending on your operating system.
Step 2: Start an R file
Congratulations, you have a brand new, empty project! Now you’ll need a place to write your code. From the File menu in your RStudio menu bar, select New File. Look how many choices you have! For the purpose of this tutorial, select R Script.
Now a new R Script window opens. This is where you’ll write your code. Before proceeding, note that the tab for the new window shows its name as Untitled1. Save the file by choosing File–>Save from the menu bar; when prompted by RStudio, give the file a name ending in .R, such as basics.R. The name should relate to what the R code is inteded to do.